Teaching myself to cook, one recipe at a time.

Tuesday, March 14, 2017

Healthy Black Bean Brownies


What would you say if I told you that you could make a chocolatey, fudgy brownie that was under 100 calories and only 2.5 grams of fat per 2.5 inch square? One that was high in protein and not totally overboard in carbs, either?

Yeah, I thought you might. 

Credit for this recipe goes to a lovely new friend of mine, Kate, who has been helping hubby and I create some guilt-free versions of the types of things that he and I like (which are typically horribly unhealthy, of course). 

No one in your house has to know that these brownies are healthy or what specifically goes into them. To be honest, you probably don't want to tell them. But you'll know. 

Start off with a can of black beans. Yes, black beans. Rinse those babies off and put them in a blender. These brownies aren't going to assemble like the ones you're used to.


Add 1/2 cup baking cocoa


1 single-serve container of unsweetened applesauce


1/4 cup of pumpkin puree


1/4 cup (or 2 large eggs worth) egg whites. I used Egg Beaters in a carton.


1/4 cup whole wheat flour


1/2 cup sugar


1 teaspoon vanilla extract


1 teaspoon baking powder


and 1/4 teaspoon of salt


And then blend it allllll up!


Once it's smooth, fold in a tablespoon of mini semi-sweet chocolate chips. Or more, I won't judge.


Spread the mixture into a square pan and tap it on the counter to get the air bubbles out,


and top with more mini semi-sweet chips (I should have pushed them down into the batter a bit but I didn't think of it).


Then bake for 25-30 minutes at 350 degrees. That's it!


After they cool completely, cut into 9 squares, and you're all set. So yummy.


Full disclosure: They're not 100% convincing. My regular brownie recipe has 2 sticks of melted butter and something like 1.5 or 2 cups of sugar, and nothing's quite going to match that sinful taste. But, these are pretty good, and if you don't tell your kids they are healthy, I doubt they'd really know. 


For those who would like to give it a try, here's the recipe.


Black Bean Brownies


1 15 oz can black beans (rinsed, drained)
1/2 c (40 g) unsweetened cocoa powder
1/2 c (113 g, one single-serve container) unsweetened applesauce
1/4 c (60 g) canned pumpkin
1/4 c (60 g) egg whites (2 large)
1/4 c (40 g) whole wheat flour 
1/2 c (100 g) sugar 
1 tsp vanilla
1 tsp baking powder 
1/4 tsp salt 
3 tbsp mini semi-sweet choc chips


Preheat oven to 350. Spray an 8x8 pan with nonstick. Put all ingredients in blender or food processor EXCEPT chips. Purée until totally smooth. Fold in 1 tbsp chocolate chips. Spread mixture in pan and bang on counter to smooth out the top. Sprinkle remaining chips on top. Bake 25-30 minutes until toothpick comes out mostly clean in center. Let cool COMPLETELY before cutting. Cut the pan into 9 pieces which makes them about 2.5 inch squares. 98 calories/serving. 2.5g fat, 22g carb, 4.5g protein.


Enjoy!


(Thanks again, Kate!)


Saturday, March 4, 2017

Greek Yogurt Pancakes


I’m baaaack!

A little background for those who aren’t familiar with this little project of mine:

I started this blog about 6 years ago to document my amateur attempts at teaching myself to cook. I posted pretty regularly, often several times a week, up through 2013, but dropped off in 2014 until I finally decided to wrap it up for a while. Our baby was born in December 2013, and I felt pretty consumed with being a mommy and trying to do everything else in my life. The baby that never wanted to be put down turned into the toddler that never wants me to leave her alone for 2 seconds because she wants me to play pretend with her. Between that, not getting a full night’s sleep until she was a year old, and work, my “cooking” consisted largely of making baby food purees, doing pre-fabbed meals or super easy ones (i.e. box of spaghetti + jar of sauce + frozen vegetables), or making the tried-and-true things I’d already blogged about. So I stopped blogging. Then I started working night shift, and that certainly hasn’t helped.

But I’m getting itch now to get back to it. I’m still not going to be constantly putting together elaborate meals or being creative like I was, but I am trying to work on eating better, and that necessarily involves trying out some new things. So here I am. Kiddo’s three now and I feel less guilty about putting her in front of Sesame Street for a little while. So here I am, sharing this morning’s breakfast with you!

*EDIT: I’ve taken two breaks from writing this so far, one to have a pretend picnic on pink plastic plates, and one to play with a Rapunzel and Belle doll (kiddo’s “sisters”). This may take a while. I’ll get started.

This morning, we had Greek Yogurt pancakes! One pancake is only 82 calories, assuming you keep them little, and they’re higher in protein (4.5 grams per pancake) than regular ones would be. I hoped this meant I wouldn’t be hungry an hour later, like I usually am with pancakes. They also didn’t make enough to feed an army, so I didn’t feel tied to the stove forever, which was nice.

I started with 2 eggs.


Then we added a small container of vanilla Greek yogurt. The pancakes get sweetness from this, so we won’t be adding any extra sugar.


 Then add 2 tablespoons of skim milk. My helper was too enthusiastic to hold off on stirring until I got a picture.


In a separate bowl, some flour and baking powder.


Then, just mix wet and dry together. I made a well in the dry ingredients, and poured in the wet.


You want pancake batter to be lumpy, but this was a little too thick, so I added 2 more tablespoons of skim milk.


Finally, melt some coconut oil in a big pan.


And then just drop the batter in the pan! If you’re anal like me and want to keep track of nutrition info, you can make sure you get 9 pancakes exactly. Or you can just wing it, like normal people would.


And flip!


For the last couple, I added some blueberries.


They turned out pretty yummy.


Toddler approved! She had two pancakes, which is more than she normally has on pancake day.


In retrospect, I’d probably skip the coconut oil and just use nonstick spray. The first few pancakes were a little greasy, which is weird. But they tasted good, and the rest came out better.
I’m sure we’ll be doing this one again!

Here is the source of the recipe, if you’re interested in trying it out. Let me know how it goes!

Sunday, July 12, 2015

My Life as a Working Mom: Slow Cooker Marathon

Last time I posted, I was sleep deprived and overwhelmed. The baby wasn’t sleeping through the night yet, and despite enthusiastic nursing, she was also consuming massive quantities of homemade vegetable purees that took a surprising amount of time and effort to make. I never felt like I had any free time to spare.

Now, I feel like I have a handle on things. She sleeps, and she eats real food. Watching her is still like playing in the midst of a tornado, but the fact that she goes to bed and generally stays asleep means that it’s all okay.

Cooking is still tricky. I feel a lot of pressure (most of it self-inflicted, to be sure, but that doesn’t make it any less anxiety-provoking) to have dinner on the table 30-45 minutes after walking in the door with the baby at the end of the day. We have spaghetti, nachos, baked chicken, anything I can do super quickly without thinking too much. Pre-bagged stir fry mixes and individually-frozen chicken breasts or fish fillets are my friends.

A few months ago, a friend of mine posted a link on facebook to a blog post about preparing 7 crock-pot meals in an hour. The same site also had posts about “20 meals in 2 hours,” “30 meals in 3 hours,” even “40 meals in 4 hours.” The appeal of spending a Sunday afternoon prepping meals that would be delicious and easy to have during the week was indescribable. So, as soon as we were moved into our new house with an actual basement, I bought a deep freezer with the idea that I’d try it out.

Prior to this weekend, I’d done two slow cooker marathons so far. Not all of the recipes were winners (in fact, some were dreadful), but some of them really were amazing. And the process is just so appealing – I get to indulge in my cooking bug once, and then don’t have to expend effort for a few weeks. Granted, it took me a lot longer than the one hour or two hours that the blogger did everything in, but in the end, it was still worth it to have prepared 14 or 20 meals in an afternoon.

It had been a while since I’ve done a slow cooker marathon, though. Part of it is inertia, part was weariness about the up-front groceries cost. It does cost a lot. I know on some level that it is cost effective because of the reduced bill in the next few weeks, but it still hurts.

But it was time to give it another shot, and since my life feels back under control, I thought I’d share the process. I do believe that regardless of how many will follow my lead, many of my friends are at least partially seduced by the appeal of not having to cook every night – even those of us who enjoy cooking. So this post is for everyone who occasionally feels overwhelmed.

Step 1: The Planning Process

The key to marathon slow-cooker preparation is planning. You have to pick out a bunch of recipes, go over the ingredients list of each, and take the time to combine them into one giant list. Sounds simple, but it took me hours to dig though link collections to pick recipes that looked good, then to consolidate a list  of ingredients from all the recipes, then organize the list into categories, and finally go through my pantry to identify what I already had and what I needed to purchase.

For those who are interested, I will share my list of recipes and my list of ingredients. I chose 10 recipes, with the intention of doubling each one so that I would end up with 20 total meals.

This is my list of recipes:
(1) Skinny Slow Cooker Creamy Chicken
(2) Crockpot Cheese Tortellini
(3) Crock Pot Santa Fe Chicken
(4) Slow Cooker Cheesy Buffalo Chicken Flautas
(5) Creamy Crockpot Chicken Stuffing and Green Beans
(6) Crockpot Angel Chicken
(7) Slow Cooker White and Garlic Chicken
(8) Slow Cooker Honey Garlic Chicken
(9) Slow-cooker Mexican-Style Shredded Beef
(10) Chicken and Dumplings

Meals 1-2 and 4-7 were new to me. I made meal 3 once, ages ago, and don’t really remember much about it, but I think we liked it. Meal 8 was shared with me by my brother and sister-in-law, after they served it to us for dinner and we loved it. The last 2 are favorites in this house.

Here's a link to my recipe sources and ingredients list. I divided the ingredients list by section (i.e. meat, produce, pantry items), and even divided the pantry items by aisle number at my local Wegman’s. That was an easy step for me, thanks to my OurGroceries app, which I have set up to organize my shopping list like this, and certainly not necessary if you are not stupidly anal about things like me.

Step 2: Shopping

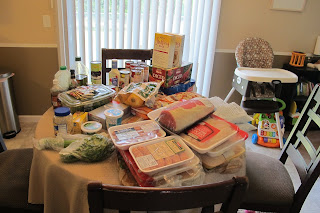
I recommend going to Sam’s Club, BJ’s, Costco, or wherever you can go to get bulk food. It’s easier and cheaper to buy 10 cans of diced tomatoes or chicken broth at one of those stores. It’s certainly better to buy the meat in 10lb packages at a warehouse store instead of 1lb packages at the grocery store. You may need to follow up with a regular grocery store to get more specific items, though. I did.

This wasn’t my complete set-up, either. I’d forgotten to add soy sauce, honey, Frank’s sauce, spices, and a few other things from my pantry. But you get the idea.

Step 3: Getting Set Up

You’ll need the whole kitchen – make sure it’s cleaned up and that there’s plenty of counter space available. Do all your breakfast dishes in advance so you have your whole sink available. You’ll also need a whisk and plenty of measuring cups and spoons, not to mention 3 bowls: two to hold in-progress meals (picture to come) and one to mix sauces in. I recommend having an easily accessible (and empty) trash, as well as a place for the big pile of recyclables that’ll pile up real fast as you empty out cans and bottles. I filled up an entire trash can while doing my slow-cooker marathon, plus two plastic shopping bags of recyclables. It’s nice to have a place to put that stuff at the beginning so you don’t have to stop in the middle of everything to take out the trash.

Very important: take the time to lay out all 20 of your gallon-size ziplock bags. Label them in advance with the name of the meal, plus whatever cooking directions apply (i.e. “Cook on low for 6-8 hours”). Also write if there’s any additional ingredients that need to be added (i.e. “Add cream cheese in last 15 minutes”) or served with (i.e. tortillas, rice, etc.).


You won’t want to dig out the original recipe when you’re ready to cook these, so it’s nice to have that information handy. Plus, things are about to get chaotic in your kitchen, and staying organized helps.

Step 4: Start Your Food Prep

Rather than prepping recipes one at a time, it makes more sense to do things in bulk. For instance, rather than chopping one onion, then another one 10 minutes later, chop all 10 at once. If you chose recipes with meat that needs to be cut up, do all that prep work at once. You’ll thank yourself. One of my recipes required browning sausage. This was the first thing I did so that it would have time to cool before I combined it with other ingredients.

Step 5: Assemble Meals

First, divvy up your meat. For instance, 2 lbs of chicken in this bag, 2 lbs of chicken in this bag, etc. I have a handy drawer in the fridge I can stick all my bags in at this point so they stay nice and cold once I’m done with this.


If you’ve cut up all your onions in advance, it’s helpful to divvy them up now, too.
Finally, begin going through your recipes one at a time, adding ingredients to the bags as needed. I have found that it’s easier if you place the in-progress bags in large bowls so that they don’t spill over. This isn’t essential, but it is helpful.


I have also found that when you’re making a sauce, it works better to take the time to whisk together the ingredients in another bowl before dumping it in the bag. I just double the recipe, then pour half in each bag for that recipe. You can use the same bowl and whisk over and over, so it’s not like you’re adding a lot of dishes.

As I start finishing up bags, I lay them in the freezer to harden. When I run out of room, I put them in the fridge until I have room in the freezer. I do my best to freeze them laid out flat so that they’re easier to deal with in the deep freezer.


Step 6: Clean Up and Recovery

This is what it looked like at the end:


If you notice, there are only 16 bags, rather than my intended 20. One issue is that I was a little too conservative when buying chicken (trying to save on cost) and didn’t quite buy enough, so I scrapped two meals. Two, the baby was starting to wake up from her nap and call out to me before I’d done the final recipe. I did a quick clean-up and called it a day.

I finished the last recipe the next morning – I put one portion straight into the crock pot and the second in a freezer bag.

The kid helped. I told her to wave for the camera.


To be honest, clean-up wasn’t terrible. I used the same bowls, measuring spoons, and other utensils over and over. And I put a lot of pantry items away as I went. So clean-up really wasn’t worse than it would have been for just a regular dinner, except for the massive amount of empty cans that I had to take outside. But since I’d planned for that, it wasn’t a big deal.

So that’s how you do a ton of slow-cooker meals in one afternoon! I’ve been considering how many meals is ideal. I see the appeal of keeping it small, but I also see the benefits of going big. Do whatever works for you!

EDIT: There's one more thing I forgot to mention. There's no rule that says you HAVE to put any of these in your slow cooker! Some, you could just thaw in the fridge and then throw them into the oven for a little while in the evening. I've done stir frys in the past with meals that I've prepped for the slow-cooker. It's still easier than mixing everything at the last minute. Do what works best for you :)

Tuesday, September 16, 2014

and life goes on...

When I began this blog three and a half years ago, I read somewhere that you should never begin a blog post by saying, “It’s been so long since I posted.” It takes away from the content without adding anything, and honestly, no one wants to read a description of the things that kept you too busy to write.

So I’m not going to describe how difficult it is for me to find a few spare minutes these days, or how 90% of my cooking efforts go toward making baby food purees, or how all I want to do when I do have a break is to eat a bowl of ice cream and go to bed.

But I feel as though I owe it to anyone who’s read this blog over the years to write this post as a bit of explanation. I’ve made the decision to suspend this little project of mine, much as I’ve enjoyed it. I’ve got a few reasons.

1. I accidentally deleted the majority of pictures that appear throughout my old posts. I was cleaning up the host site and did something stupid, and now most of the pictures are gone. I have the originals all on my hard drive, but the thought of going back through 3 1/2 years of posts to add them back in is just daunting. The whole issue makes me want to cry. Anyone up to doing this for me?

2. Many of the meals that I have cooked lately have appeared in some form on another blog. Maybe it’s the academic in me, but there’s a very big part of me that feels squeamish writing about recipes that someone else has already written about, even if I assign full credit to the original source. Besides it not being my own content, my version is also typically an amateur version of something that’s already been beautifully done. If my cooking and my photography aren’t as good as the original, I’m not adding anything creative or new by posting about it.

3. I truly struggle with the fact that days are only 24 hours long, that I work full time, that I want to be with my baby every moment that I can at home, that she isn’t a great sleeper and that I'm always hoping for a better night sleep tonight.

I’ve really, really enjoyed writing this blog. I have learned a lot and have expanded my knowledge, and I’ve enjoyed sharing with other people. I love when people tell me that they’ve read the blog and that they enjoy seeing new posts. So thank you, those of you who have kept up with me. It means more than you know.

I would like to resume posting at some point, several years in the future. It kills me to join the ranks of defunct blogs that never got off the ground, and I hope this doesn’t get forgotten like so many of them do. I put a lot of my heart and soul into this project and I really believe that I’ll come back to it when my life allows it.


Until then, this is it.

Wednesday, April 30, 2014

Classic Lemon Pepper Chicken

Hey, a new post! It’s been a while. Sorry about that. It’s not that I never cook anymore, but rather that it’s pretty hard to find the time to cook and take pictures and then blog about the experience when you’ve got a baby. Normally, whenever I get a few free minutes, I spend them trying to frantically brush my teeth, clean the dishes, and do whatever else I can do around the house before Baby wakes up or needs my attention again.

IMG_9799

But Baby is sleeping peacefully in her crib right now, and the dishes are done (because hubby picked up dinner on the way home), so I’ve got a little time. So I’ll share a super simple recipe that I found and tried out a few days ago.

When I’m strapped for time, baby or not, I look for recipes with few dishes to clean, few ingredients to use, and few steps to go through. This is one of those recipes.

First, start with a little bit of all-purpose flour.

IMG_9773

Add a tablespoon of lemon-pepper seasoning, which you bought several years ago for a recipe and have barely touched since, and won’t toss out even though you’re not supposed to hold onto spices for long because hey, there’s nothing wrong with it.

IMG_9775

IMG_9776

IMG_9777

Mix the flour and seasoning up.

IMG_9779

Next, prepare some chicken breasts. Mine were big, so I used a big knife to cut them into thinner pieces. I failed at making them similar sizes. Oh well, you win some and you lose some.

IMG_9781

Throw some butter in a skillet…

IMG_9782

And then, one by one, dip pieces of chicken in the flour. Turn it so it’s coated on both sides.

IMG_9787

And drop them in the pan. Don’t overcrowd the pan too much; do the chicken in shifts if you have to (and I had to).

IMG_9788

After a few minutes of sizzling, turn the chicken over.

IMG_9795

And that’s it! Take it out of the pan when it’s cooked through, and you’re done. Serve with some green beans and potatoes or something like that, and you’ve got a fairly healthy (except for the whole frying-in-butter part) and easy meal.

IMG_9798

A nice way to use the chicken breasts that I always seem to have on hand and not know what to do with.

Source: Classic Lemon Pepper Chicken